Monday 27 January 2014

Products Of The Week | TeensWithABlog

Posted by Unknown at 1/27/2014 0 comments
As you may of guessed we have a Product of the week post for you today! Both of us have picked out a product that we have been loving and think deserves to be our product of the week! So lets get started!


Chloe's Product of the week: 

My product of the week has to be the Maybelline Colour Tattoo in the shade 'On & On Bronze'. Since buying it about 2 weeks ago, its been apart of my everyday routine. Its a perfect base colour for school. I usually apply it and then blend 'dreamy' 'Obsessed' or 'Lavish' from the MUA Undress Me Too pallet  into my crease and honestly I've had so many complements since wearing it and I think that the MUA pallet and the Maybelline Colour Tattoo go great together!


Cerys' Product Of The Week:

My Favourite product of the week is the Miss Manga MEGA VOLUME from L'Oreal Paris. This is a new mascara in shade black/noir this was a bargain at £5.99 in Superdrug. This came out a couple of days after my mascara ran out so this was a perfect excuse to try this out. It doesn't say its waterproof but I was amazed when it survived a rain shower on the way home and I didn't look like a Panda! so this mascara is a must have and has well earned its way to my product of the week. It gives a great full lash look and has a amazing 360 brush I literally have never had an amazing mascara before and recommend this to everyone!

So guys this is our products of the week, if you want this to happen every week or month or anything like that then let us know so we can carry on :) Keep looking every Monday for our joint uploads we have some amazing posts planned even a fashion February collab post next week and throughout February.
Thanks for reading
 TeensWithABlof x

Wednesday 22 January 2014

Mini Haul / First Impressions | Chloe

Posted by Unknown at 1/22/2014 1 comments

If you follow us on twitter (*cough* @/Teenswithablog *cough*) you may or may not have known that about a week a go I order a few things from the superdrug website. It was my first time ordering off the website and I have to say I was impressed! I placed my order on Sunday night and the package arrived Wednesday, which is pretty quick considering I didn't have to pay of delivery! (Spend over £10 and you get free delivery.)
Anyway I thought I'd do a mini haul / first impressions post as I've had a chance to try them all out since getting them.

First thing I decided to get was the 'Maybelline Great Lash Mascara' in Blackest Black.

I have to say the brush didn't really impress me when I first opened it. Its nothing special and looked a little bit short for my liking. Apart from that I think the packaging is really retro looking and colourful. The formula of it is a little wet but does make my lashes look better after 2/3 coats. I'm not sure if I'd purchase this again, I'll have to see. This cost me £4.99

Second thing I got was 'Maybelline Colour Tattoo Eye shadow' in the shade 'On & On Bronze'

I was so excited to get this because I have heard a lot about it! Its a great base colour or just on its own for a causal look. It is small but I can tell that its going to last a long time! It did stay on all day and didn't crease, I think I will have to repurchase this and get some other shades. And a bonus I got it for half prices as Superdrug have a 'buy one get the second half price' on selected Maybelline products. Original price was £4.99 and the sale price was £2.50


Third thing I got was '2True Cheek n Lip Tint' in 'Shade 1'. 

And I have to say this was the thing I was most disappointed with. Its a dupe of the Benefits Benetint but honestly its not a very good tint. I applied it to my cheeks and blended it in as I normally would but for some reason I had 2 streaky lines on my cheeks! Whether this was because I didn't blend enough, I don't know, but it looked horrible! I haven't tried it on my lips yet, lets hope its better as a lip tint then it is a cheek tint. At the moment I wouldn't purchase this again! This cost me £1.99 

Next I got 'MUA Liquid Eyeliner' in  'Waterproof Black'.

Now I haven't tried this out since getting it as I'm always in a rush in the morning and I know I will end up looking like a panda! But the packaging is cute and even though its little I know it will last a while as I don't wear eye liner to school very often. I can't really say if I would buy this again but for £1 I think I probably will!


Last thing I got was 'MUA Undress Your Skin Highlighting Powder'.

Now MUA are one of my favourite brands! Their products are so cheap but great quality! I love the patten that is on the powder, I think its super cute! I've used this once or twice and I can tell its going to be a favourite of mine!


I hope you enjoyed this mini haul/ first impressions post! Sorry for the lack of post lately, we've been so busy with coursework and other stuff but hopefully we will be uploading a lot more! 

Till next time! :)


Chloe x


Thursday 9 January 2014

4 simple buns

Posted by Unknown at 1/09/2014 0 comments
Hello again :)
This post is going to be 4 simple bun styles. (2 for long hair and 2 for short) 


1st style: top knot messy bun.
For the first style you will need longer hair

You will need:
1) Hair Brush
2) Hair Band
3) Grips/Bobby Pins
4) Hairspray
5) Head Band or Hair Accessories. (optional)


Step by step: 
First step:
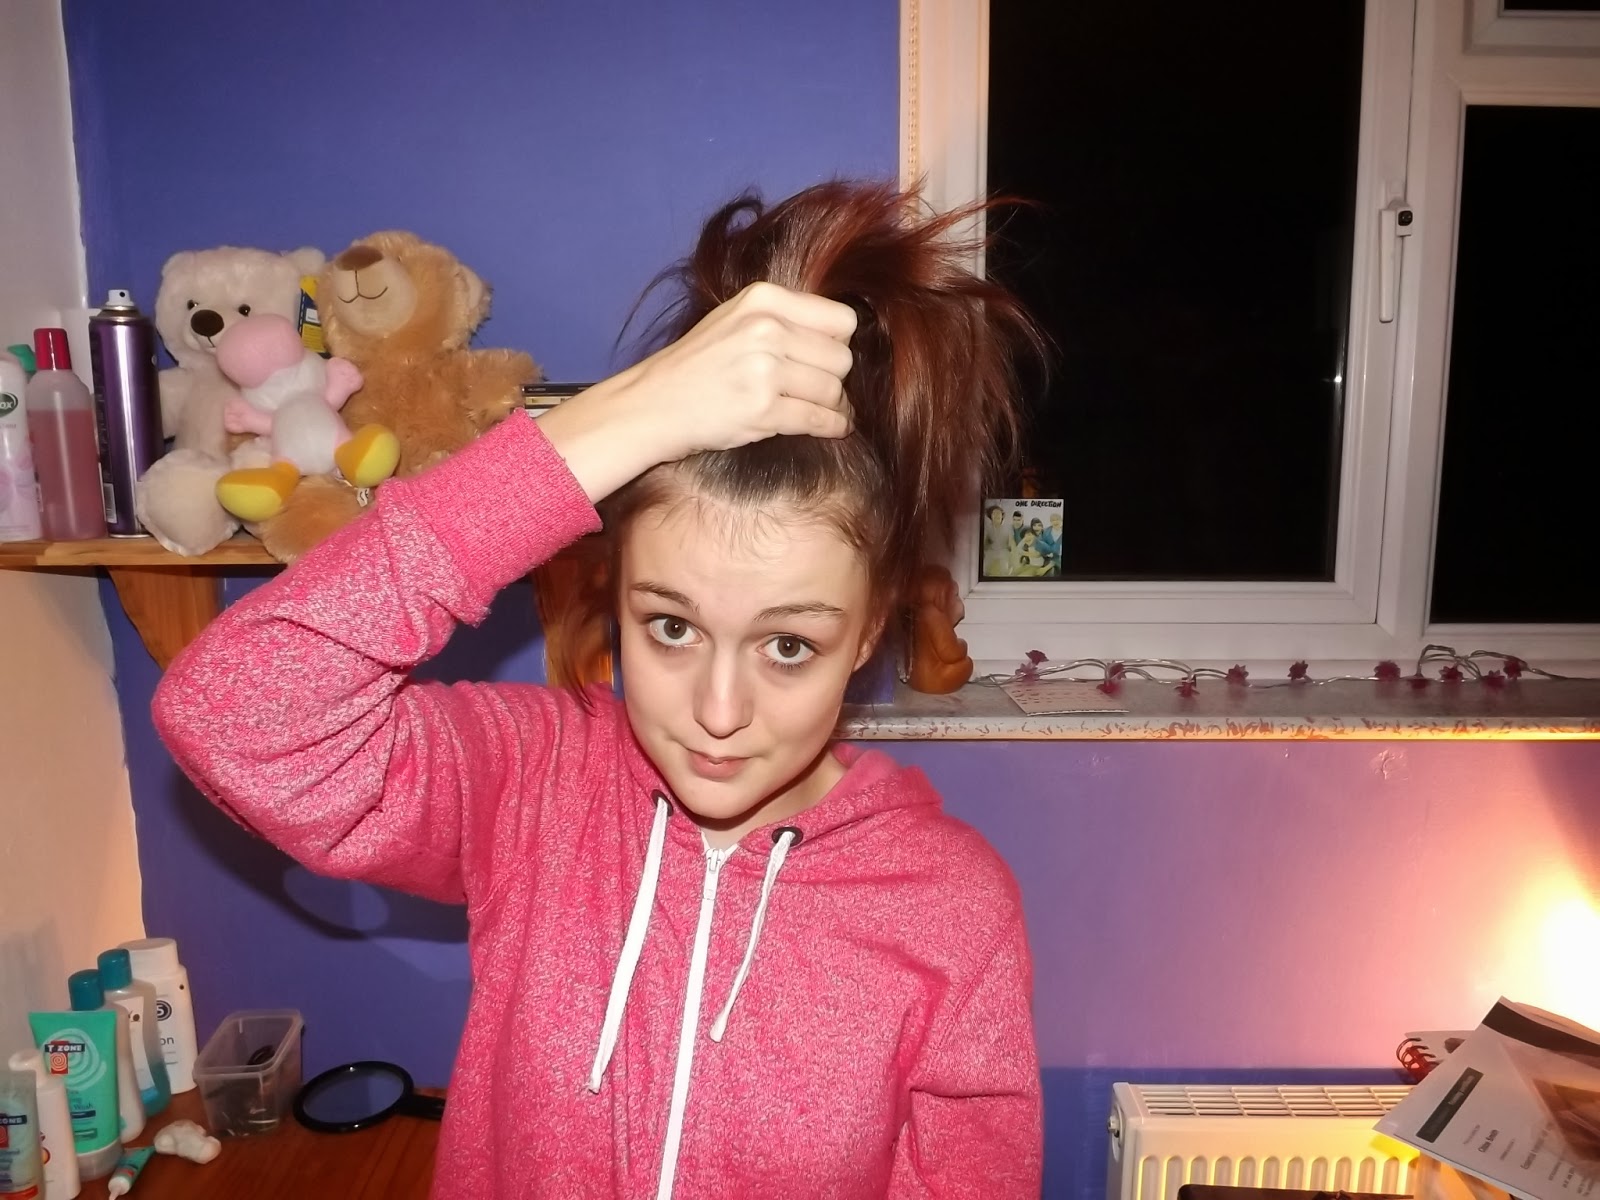
You may want to curl your hair for this style to give it more volume and a curly appearance but straight hair like mine works just the same. Tease lightly near the roots to add volume. Also tease the ends slightly.
 
Second step:
Now you need to put you head upside down and gather the hair into a high pony tail. loosen your grip of your hair so the roots are not pulled back and the hair looks like a messy, loose pony tail. Put the hair into a high half pony tail then pull and loosen the roots to however you desire.
 
Third step:
Next you need to mess up the bun then clamp with your hand. Then tie with a hair band (yes it will most likely look silly) Now arrange and grip different parts of the bun so it is secured to the head and looks good.


Fourth step:
You can now add a head band or small hair accessories if you want, pull some parts from the sides of your face to finish the look, add hairspray after all adjustments are made :)
 

2nd style: neat doughnut bun
For the second style you will also need longer hair 

You will need:
1) Hair Brush
2) Hair Band
3) Grips/Bobby Pins
4) Hairspray
5) Hair Doughnut
6) Head Band or Hair Accessories. (optional)


Step by step: 
First step:
Gather all the hair into a pony tail (to whatever height you want the bun to be, I prefer it to be high), make sure all of the hair is back neatly, then you need to secure with a hair band.
Now grab your hair doughnut and place through the pony tail.


                This To This


Second step:
Take the hair doughnut to the top of the pony tail this method is the same as the sock bun some of you may know already. now start to roll the hair through the doughnut.


Third step:
Grab some grips and grip down anything needed, anything that looks out of place or anything that feels loose. Now spray with hairspray generously.


Fourth step:
Add your accessories and pull small pieces of hair to shape the face.


3rd style: Top knot messy bun.
 you can have shorter hair like mine(but not really any shorter than this)
 

You will need:
1) hair tie
2) bobby pin/grips
3) hair spray
4) accessory (optional)
5) Hair Brush
This similar to the first one just made suitable for shorter hair :D

Step by step: 
First step:
 (You may want to add a little back comb to you hair before you begin to give volume and to make it slightly messier)
Gather your hair into a high pony, so it looks a bit like a pineapple. If you have a side fringe/ bangs try and include the as well. (my fringe is past too my nose so a 'fringe' that long will go up)
The photo is rubbish sorry.


Second step:
Wrap your hair around one finger, creating a doughnut shape. Secure it by tying hair tie, not to tight. The shape of this doesn't have to be perfect as after all we are going for the messy look.


Third step:
It should look a little like a ballerina bun. What you want to do is start pulling gently at the front of your hair, to make the bun loser. It will also help to make it look not so neat. Also pull bits down at the side of
your face to frame it.
(hair spray if you need to just don't hairspray the bun yet)


Fourth step:
start to pull sections of your bun apart. (the picture should hopefully help explain) keep going until you are happy with the size and shape of it, don't worry if bits fall out we can grip them later!


Fifth step:
Grip the back of your hair (if you need to) loosely and any other bits that need it . Hair spray your whole head and then you're done. You can add a pretty bow or any other accessory to complete the look, but you don't have to.


The last style is going to be for shorter hair as well (We find this works best with shorter hair than longer hair) 

You will need:
(Same as above)


Step by step: 
First step:
Back comb the ends of your hair lightly with a brush or comb. And gather your hair into a high pony tail (not as high as the other style) and tie it.


Second step:
When you tie it only pull half of your hair through the hair tie (it will look pretty stupid as the moment)


Third step:
Pull your hair out and up of the loop to form a bun looking shape.


Fourth step:
Pull lightly at your hair, just like in the last style.


Fifth step:
grip any bits that need gripping and add a little bow if you want :)
Also pull bits of your hair from the side down to frame your face.
(this hair style didn't really like I wanted to)


We hope this post helped you :) 

 TypicalTeens x

Wednesday 8 January 2014

quick OOTD!

Posted by Unknown at 1/08/2014 0 comments
I've got a quick and simple post for you lot today :) Sorry for the lack of posts school started Monday and its been a bit stressful to say the least.

This outfit is a casual look with a little bit of an edge and most of it didn't cost that much!

Start off with the top half! I'm going for a simple white or black cami top to keep warm as its colder outside. You can pick them up from just about anywhere for £2-4


Over the top I put this over sized Marvel comic top from Primark. This is a size 12 and cost me £8.00 (you might recognise this from my Christmas sale haul)

(my camera went out of focus I'm sorry)

I'm going to accessorize with my favourite necklace at the moment! That Cerys' got me for Christmas.


Bottoms next! As its cold I've gone for burgundy coloured jeans. I honestly can't remember the price but I know the were from Matalan!


For my shoes I chose these shoes that my dad got me for my birthday. They were from Animal and I think they were £45?


I'm sorry this post is really short but I hope you liked it and I've made a youtube video showing the outfit in a bit more detail :) So click here to see it

I'll speak to you later!

Chloe x


Wednesday 1 January 2014

New Years Resolutions

Posted by Unknown at 1/01/2014 0 comments

Its the end of 2013!! Can't believe how quick this year has gone by!
You may have guessed by the title of this post that 1 have set myself new years resolutions! I have decided set myself 1 beauty, 1 fashion and 1 lifestyle related resolution.


Number 1:
Start the gym! Cerys and I have been saying for ages how we wanted to start the gym last year, but never got round to it :(

Number 2:
Master the smoky eye and winged eye liner look! I am terrible at both of these and when ever I try it always go wrong.

Number 3:
Try out new looks! I always want to wear different stuff and try new looks but never really have the confidence, but this year i'm going to go for it!

Let me know what your New Years Resolutions are and if you ever stick to them!

this is an extremely short post, I'm sorry about that but there will be another post from both of us going out tomorrow :) or maybe even later today!

I'll speak to you later

Chloe x


TeensWithABlog Copyright © 2012 Design by Antonia Sundrani Vinte e poucos